Croquembouche
Baked Churros
February 03, 2019
October 14, 2018
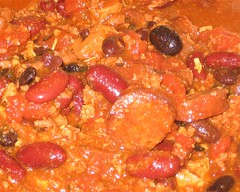
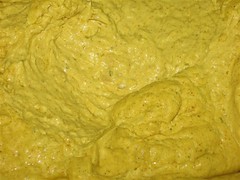
Veggie Mole Chili
- 12 oz package frozen veggie crumbles
- ~1/2 cup Mole sauce (allergy warning: might have peanut products)
- onions-I got red onions and mixed peppers pre-cut, they are about 3/4 cup each
- peppers-see above
- 1 can chili ready tomatoes
- 1 can tomatoes with peppers
- 1 can black beans
- 1 can chili beans in chili gravy
- 1 quart broth
- chili powder and your favorite chili flavorings, OR 1 package chili mix

Heat crumbles in mole sauce. Set aside.
Cook peppers and onions-save some back for garnish, if you want.
Add beans, cook some more.
Add Mole crumbles, cook some more.
Add tomatoes and broth-you might not need all the broth, make it as thick as you like.
Add chili and/or other seasonings.
Heat to boil, reduce heat to medium, cook as long as it takes to make a package of refrigerator cinnamon rolls, or 25-30 minutes.
August 20, 2018
Monday-Easy Vegetarian Goulash

My idea of Goulash is pasta, meat, and beans. That's how we made it at home. With chili powder as a garnish, and sometimes cheese as an add-in. Feeling a bit comfort food-needy, and it being Monday, so it needs to be easy, this is what I came up with:
Monday-Easy Vegetarian Goulash
- 1 can vegetarian chili with beans
- 1 can black beans, drained (and rinsed, if you like)
- 1 can tomatoes with garlic (or whatever you like)
- whatever noodles you have on hand
Cook and drain the noodles, if necessary. Add cans to noodles, heat through. Add whatever else your favorite bits might be: black olives, mushrooms, grape tomatoes, onion, garlic, always garlic.
Enjoy!
January 09, 2016
Gingerdoodle Sugar
 |
| Gingerdoodle in progress |
Leftover Gingerdoodle sugar is also yummy on toast.
Gingerdoodle Sugar
(like Cinnamon & Sugar)
December 24, 2015
Gingerdoodle

Gingerdoodles
- Refrigerated Gingerbread cookie dough
- 3/4 cup sugar
- 1 TBSP ground cinnamon
- 1/2 tsp ground cloves
- 1/4 tsp ground ginger
Preheat oven according to package directions (350)
Mix all but dough together in bowl with fork or whisk
Using spoon or cookie scoop, make balls of cold dough (put back in fridge between pans)
Roll balls in cinn/sugar mixture
Bake 9-11 minutes, let sit on pan for 2 minutes
April 26, 2014
How do I love Easy Cheese Danish? Let me count the ways...

Let's show some Easy Cheese Danish love!
First, I love it regular, just like the recipe.
(Recipe in previous post and here)
I've made it both ways, the full of the recipe, and the 1/2 as it suggests in the notes, and we like it better with just 1/2 the filling.

Next, I love it with raspberry preserves.
Make the filling just the same, put down the bottom layer of crescent rolls the same as the original recipe. Then smear preserves all over the bottom layer. I'm a raspberry gal, but I'm sure strawberry or even peach would work great also.
Pour the filling over the preserves, add the top layer, and the rest is the same.
Awesomely super tart!

Next, I love it with mini chocolate chips!
I mixed 1 cup of semi-sweet mini chocolate chips right into the batter (again, the 1/2 batter recipe).
It baked up so nice and chocolatey.
The next step would be to make it raspberry AND chocolate! Some time, I'm going to try using both of these variations in the same batch! I think that would be killer awesome.
We also loved it in a key lime kind of way, but somehow, I don't have any photos of that experiment. And since I usually keep track of my experimental recipes with my photos, I don't remember exactly how I made it. Here's what I remember: Lime juice instead of milk in the glaze, some lime juice in the batter (how much? guessing a couple TBS), and fresh lime zest on top. I put the zest on before baking, it would have been better to bake it sans zest, and put the zest on at the end, for looks and baking the zest too long, it got crunchy. But the key lime easy cheese danish was still great.

Couple hints/ideas:
Any time you are making glaze or something like this, instead of getting out your whisk, just use a small container with a lid. Shake, shake, shake! No extra utensil required.
You can, of course, buy the crescent roll sheets, that would be perfect for this. I usually buy the generic kind, which don't (yet) come in a sheet, so I unroll the sheet on waxed paper to flatten it out, and connect all the seams. I do this even on the bottom layer, then flop it into the pan.
I'm thinking about making a savory version of this, and using my favorite crescent rolls, the garlic butter ones! What would I put in it instead of sugar I wonder...
Thanks again to The Adventures of Kitchen Girl for this awesome recipe! Enjoy!!

May 10, 2013
Easy Cheese Danish
Recipe found here. I am going to go make these right now! Oooo, better plug in the camera battery first
"Easy Cheese Danish
Ingredients:2 cans ready to use refrigerated crescent rolls
2 8-ounce packages cream cheese
1 cup sugar
1 teaspoon vanilla extract
1 egg
1 egg white
Glaze:
1/2 cup powdered sugar
2 Tablespoons milk
1/2 teaspoon vanilla extract
Method:
Preheat oven to 350* degrees and grease a 13X9-inch baking pan. Lay a pack of crescent rolls in the pan and pinch the openings together. Beat the cream cheese, sugar, vanilla, and egg together until smooth. Spread the mixture over the crescent rolls evenly and then lay the second pack of crescent rolls on top of the cheese mixture and brush with egg white. Bake for 35-45 minutes until the top is golden brown. Top with glaze after cooling for 20 minutes.
Kitchen Notes:
I have made this danish using low fat cream cheese and splenda (sugar substitute) and it was delicious! Also, the amount of filling the original recipe calls for makes a VERY heavily filled danish. I have halved the filling using 1 package of cream cheese, 1/2 cup of sugar, 1 whole egg, and a 1/2 teaspoon of vanilla extract and it was still very good. If you use the half filling method, bake for closer to 30-35 minutes."
April 22, 2013

November 25, 2010
Corn Bake Casserole
This recipe came from my former mother-in-law. She made it for the big family meals, and I loved it so much, I got the recipe and started bringing it to my side of the family big family meals. So my family attributes the recipe to me.
It's funny how we have 'official' recipes and then we have how we really make it. I'll list the official recipe, but then I'll tell you the secrets, as well.
Oh, and an aside: this recipe always reminds me to never, I repeat NEVER put your good casserole dish on the car while you're strapping your kidlets into their car seats. Because you might forget it there! Oh, and it was a great casserole dish, I still mourn it, it was older fashioned corning ware made to go in a special crock-pot type warmer, so it could either go in the regular oven, or in the crock-pot warmer thing. And I never found where to get a replacement dish for it, even though I carried around the warmer part through several moves, clinging to the possibility of maybe finding a dish that would fit.
Corn Bake Casserole
Small onion (optional)
One quarter green pepper (optional)
One stick butter or margarine
One can whole kernal corn
One can creamed corn
One box corn bread mix
Three eggs
One cup sour cream
One cup grated cheddar cheese
If using onion &/or pepper, saute in butter, if not melt butter. In a bowl, mix cans of corn (draining whole corn), corn bread mix, and eggs. Add cooled butter (or butter mixture). Place in 2 quart casserole dish. In a separate bowl, mix sour cream and grated cheese together. Drop cheese mixture by spoonfuls into casserole. Do not mix.
Bake 45 minutes at 350, or until center is firm.
Secrets:
Even when my MIL first gave me the recipe, I realized that she didn't do it exactly as written. She skipped the green pepper, which I also have always done. And she doubled the sour cream and shredded cheddar, which, of course, I have also always done. I think that's the key to the yumminess. If you made it without the doubling, I think it would be more of a cornbread than the cheesy yummy goodness that it becomes.
My addition was well placed good quality paprika. Paprika goes so well with cheesy, and with corn, so I started adding a good sprinkling to the cheese and sour cream mixture. Maybe 1-2 TBSP, to taste and look.
Other ideas:
Use sour cream with chives, instead of plain.
Use green onions instead of or in addition to regular onions.
I usually use sharp cheddar, but you could also try co-jack, smoked or medium cheddar, or would it be wild to use shredded Swiss?
This recipe is also very easy to double. If you do, you don't necessarily need to double the doubling of the sour cream and cheese. Use your own judgment.
January 30, 2009
Links
A blog that combines two of my passions, and will be posted on two of my blogs: The Gamer's Cookbook
Cookstr is in beta, but looks to be off to a good start.
Thrift Kitchen a new blog who's name should explain it all.
And a link for me for later, something that I want to make for me and the other veggie-wannabe in the house, smashed chickpeas.
Cookstr is in beta, but looks to be off to a good start.
Thrift Kitchen a new blog who's name should explain it all.
And a link for me for later, something that I want to make for me and the other veggie-wannabe in the house, smashed chickpeas.
January 02, 2009
X-Mas Dinner
 I wanted to share my menu for Christmas dinner this year, no recipes, but just a foodie story.
 I've wanted to try tur-duc-hen ever since the first time I heard about it on the Food Network. It's a chicken stuffed inside a duck, stuffed inside a turkey, with stuffing inside the chicken to boot! I was surprised a few years ago when I saw some for sale in the local grocery stores, but more surprised by the price: $60.00! Well, I guess that's probably a good price for what you're getting. But I'd always wanted to get one, even waiting for the after-holiday sales, but the price never went below $50. Then, this year, I found a tur-duc-hen roll, with just the breasts of each bird, and stuffing inside, with a much nicer price of $20.
Not enough to feed the whole family, and a couple of us are heading back to vegetarianism, so I picked up a Tofurkey to go with it.
Still not enough food, and it is possible for someone to be picky against both of the other 'meat' options, so I picked up a cheap ham to go with.
It's so fun to say the menu: Tofurky, Tur-duc-hen, and Ham!
And they all could just go in the oven nice and neat (after I did a little math to figure out when to start everything!), so not too much work, either. Mom brought an awesome potato casserole, since I didn't want to try to undertake smashed potatoes and gravy and everything this year, we had a time line for being finished eating, as the BFF had to leave for work at 2:15.
The one slightly time consuming part was fresh asparagus, but I love it so much, and it's really so quick, that I was willing to do that much work! ;p
August 31, 2008
Brains!!!
 The BFF's birthday was yesterday (Happy Birthday, Honey!), and one of my gifts to him was having a drawing made of him as a zombie from Monster By Mail. We love zombie movies, and especially zombie games, and I've had it planned for a while to have him drawn as a zombie. Since his birthday was going to fall on a Saturday, when he doesn't work, but I like making treats for him to share at work, so I decided a long time ago, to make zombie related treats for his work. I changed my mind on exactly what and how, but
 came up with brain cupcakes.
(I want to make more cupcakes! They are easy-peasy if you use a box mix, and still easy if you use a box plus add-ins, and they are easy to share, and easy to only eat one. I've been wanting a cupcake carrier, that I will buy myself if I don't get it for birthday/Christmas this year, because I want to be a cupcake chick!)
So back to the brains! My original idea was to spread the cupcakes with pink-ish frosting, and then use red gel overtop to draw on the lines. This idea came from embroidering felt brains (see my other blog), but as I thought about it more, embroidery techniques don't exactly transfer to frosting.
So a web search brought me another great idea, piping the shape of the brain parts. (Link. Link.) I realized this would be much easier, and probably cuter!
 When I did a couple practice brains, I could see that the frosting was going to get too warm too quickly, and didn't want to run into melting brains, so I put the frosting in the fridge and made the colors in small batches. This worked great, because The Artist Extreeme, with his ever great ideas, suggested that I make a few different colors of brains, to represent different stages of...urm...'freshness'...you know, some zombies like a nice fresh pink brain, others might like a day-old brain, everyone has different tastes. ;p In real life I used dark chocolate fudge cake mix, and cream cheese frosting (both store bought), which was a delicious combo.
I did the zippy bag as pastry bag trick, which worked great, except when the first bag wore out, and I had tiny pink lattice work running down my skirt. (why didn't I put on my apron?) Here's a couple tricks with the zippy bag: use one bigger than you think you need, use the freezer kind, they are thicker, and I didn't have the right kind of tips, so I cut up a plastic squeeze bottle to make the tip. That worked since I only wanted a circle hole tip, wouldn't work for fancy tips. But also worked great so that I could cut it to the exact size. I had two tops, so cut them to different sized circles, using the smaller one when the frosting was starting to warm up.
All-in-all, over 40 brains in varying colors, and some dripping blood or brain juice (gel frosting again from the store) were brought to work with The BFF, and everyone loved them! He even got some photos of some of his work friends eating brains (including the anchors-those will be good shots for the year end party!)


August 23, 2008
Cooking with iTouch
I like finding recipes on All Recipes.com, I love that you can save your recipes on their site. I know there are other recipe sites that also have recipe box or books, I use a couple others, but I like All Recipes best. I get their e-mail weekly, so I am always checking out new recipes from them.
I've been trying to simplify my big cooking on the weekends, so I have more time with all my guys, so I've been loving using a crock pot meal for one of my weekend suppers. I can get it all in the crock pot maybe even before others are awake, and then not have much more work to do on that meal.
And a bit more background, since I don't update this blog very often: we just got a new iMac this week!!! And if that's not enough, got an iTouch with it because it had a special deal.
So I found a great sounding crock pot recipe (Easy Cheesy Chicken 1*)this week, saved it in my All Recipes recipe box, and this morning, began to get it ready. But The BFF was already up, and on our new computer, so I went to his old computer to see about printing the recipe. And what is sitting on his desk but his iTouch, which he is generously sharing with me, as much as you can share a portable computer thing like that. But I got excited when I realized what I could do with the iTouch, I could look up the recipe on All Recipes, and take the portable thing with me to the kitchen, and not even have to waste paper for printing! He bought a little stand for it, so I could even make it stand up on the counter. I was tickled beyond belief, and he kept asking me why I was giggling!
Too much fun!!!

*in full disclosure on the recipe, I used turkey breast instead of chicken, and it was completely delicious!
April 27, 2008
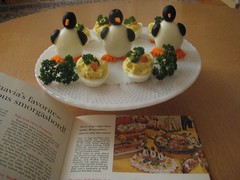
Smorgasbord penguins
Awesome penguin eggs! This comes from a cool flickr group of retro food. Stuff I need to try!
November 09, 2007
Award-Winning Five Live Radar Chili
Three meats, two beans, that's Five Live Radar! Garlic and onions without having to chop them, marinating, and the crock pot make this recipe less time consuming. (Five Live Radar is part of the Channel 8 weather expertise)
Ingredients:
1 lb chicken breast (about 3 breasts)
1 TBSP garlic powder
2 TBSP cumin
2 TBSP mild chili powder
1 TBSP hot chili powder
3 TBSP cooking oil
1 lb hamburger
1 lb Super Saver "original" Polish sausages (about 5)
1 15.5 oz can black beans
1 15.5 oz can dark red kidney beans
1 15 oz can tomato sauce
2 14.5 oz can diced tomatoes with roasted garlic and onions
Instructions:
Two days ahead of serving:
Put garlic, and ONE TBSP of each cumin and mild chili powder, and oil into large zippy bag, make sure spices mix with oil. Poke chicken breasts with fork, add to bag. Smush around until chicken is coated well. Refrigerate overnight, smush the chicken around whenever you pass the fridge.
The night before serving:
Remove chicken from marinate, bake in cake pan for 40 minutes at 350 degrees. (Dispose of bag!) While chicken is baking, fry hamburger, drain. Cut sausage into about 1/2" slices. Fry the sausage for added flavor (optional). When chicken is baked, cut each breast into bite-sized pieces. Put all drained meat into crock pot. Drain and rinse beans. (Rinsing removes some of bean's gassiness--supposedly) Add tomato sauce and diced tomatoes, hot chili powder, and the other TBSPs of cumin and mild chili powder. Cover crock pot and turn on 'warm' or 'low'. Cook overnight.
October 25, 2007
Just Because It Doesn't Have Spice, Doesn't Mean It Doesn't Have Taste Corn Salad
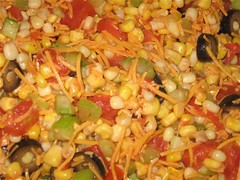
Just Because It Doesn't Have Spice, Doesn't Mean It Doesn't Have Taste Corn Salad
Originally uploaded by seeshells
Mild Corn Salad
2 cans (15.25 oz) white corn
2 packages (1 lb) frozen yellow corn
1 can (6 oz) medium black olives
2 cans (14.5 oz) diced tomatoes with basil and garlic
1 bunch celery
2 cups finely shredded sharp cheddar
Thaw frozen corn in strainer under cool water. Chop black olives and celery, add to strainer. Empty white corn cans into strainer too. Drain well. Move to bowl. Add tomatoes, draining somewhat if needed, and add cheese. Fold ingredients, don't stir. Refrigerate until serving. Makes about 10-13 cups.
P.S. I had 6 cup containers to put the salad in, so I filled one with this mild version, and chopped up 1/2 onion and added it to the rest of the salad, and filled another container with the regular version.
I wonder which will be eaten quicker? ;p
October 17, 2007
Tuna Mountain Climbers
Tuna Mountain Climbers were one of the popular dishes made in my elementary school. One of my favorites. The lunch ladies made them on left over hamburger buns and used plastic-wrapped cheese, but in my updated recipe, I'm using Texas Toast and CoJack. I don't know where the name came from, they are just tuna melts afterall.
We had 'runzas' in our elementary school, too, until the Runza fast food place got popular enough, that we couldn't use the word 'runza' without their copyright. I am always interested in hearing stories from people about what they had in their elementary school lunch room, some things were very regional from what I can figure.
Mustardy Tuna Salad
1 cup sweet pickle relish (the kind with mustard seeds)
1 tsp mustard seeds
1 cup chopped celery (about 2 long stalks)
1/2 cup onion (about 1/4 medium)
6 6oz cans water packed tuna (the little ones were on sale)
1 cup plain yellow mustard (the only reason to have plain mustard in the fridge)
1/2 cup salad dressing (or mayo if you prefer)
Also needed:
Texas toast
sliced tomatoes
deli sliced colby/jack cheese
Combine pickle relish and mustard seed. The way I see it, the mustard seeds are the best part of the relish and the relish is one of the best parts of the tuna salad, so I added extra. The mustard seed is hard out of the bottle, so combining with the pickle relish will start to soften them up. Do this combination before even starting to chop, to give the seeds a lot of time marinating in the relish.
Chop the onion and celery, add to relish along with tuna. Stir this part together before adding the wetter parts, to get the tuna un-chunked, and get all the ingriedients blended together. Add mustard and mayo and stir well.
Of course, if you're not as big of a mustard fan as I am, you could do more salad dressing and less mustard. 3/4 cup of each would work.
Putting it all together:
Set oven to 300 degrees. Put the Texas Toast, in one layer, on a cookie sheet covered with tinfoil (in case of leakage, you can skip the tinfoil if you want). Toast the toast in the oven for 5-7 minutes on one side, flip, and do again 5-7 minutes on the other side. You're not going for toasted toast, just crisp up the bread. If you weren't too worried about fat and all that, you could coat each side with butter or margarine for a moister toast, but it's not needed.
After toasting both sides, carefully spread one big spoonfull of tuna salad onto the toast, getting it into the corners and making it flat on top. Add one tomato slice on top of each mountain, and top with one slice of colby jack cheese. Bake for 10-13 minutes or tuna is heated through and cheese is melted. If you like crispy, you could broil it at the end.
PS How many does it serve? I dunno. Our servings at our house aren't the same as the ones on the packages. This recipe as is, is probably servings for about 6-8. We served 4 plus about equal in leftovers.
PPSS The Texas Toast is 19 grams of carbs per slice. Which isn't so bad, because they are open faced sandwiches. If you use the tuna salad for regular sandwiches, we use the low carb bread that's about 9 grams of carbs each. About the same difference.
We had 'runzas' in our elementary school, too, until the Runza fast food place got popular enough, that we couldn't use the word 'runza' without their copyright. I am always interested in hearing stories from people about what they had in their elementary school lunch room, some things were very regional from what I can figure.
Mustardy Tuna Salad

1 cup sweet pickle relish (the kind with mustard seeds)
1 tsp mustard seeds
1 cup chopped celery (about 2 long stalks)
1/2 cup onion (about 1/4 medium)
6 6oz cans water packed tuna (the little ones were on sale)
1 cup plain yellow mustard (the only reason to have plain mustard in the fridge)
1/2 cup salad dressing (or mayo if you prefer)
Also needed:
Texas toast
sliced tomatoes
deli sliced colby/jack cheese
Combine pickle relish and mustard seed. The way I see it, the mustard seeds are the best part of the relish and the relish is one of the best parts of the tuna salad, so I added extra. The mustard seed is hard out of the bottle, so combining with the pickle relish will start to soften them up. Do this combination before even starting to chop, to give the seeds a lot of time marinating in the relish.
Chop the onion and celery, add to relish along with tuna. Stir this part together before adding the wetter parts, to get the tuna un-chunked, and get all the ingriedients blended together. Add mustard and mayo and stir well.
Of course, if you're not as big of a mustard fan as I am, you could do more salad dressing and less mustard. 3/4 cup of each would work.
Putting it all together:
Set oven to 300 degrees. Put the Texas Toast, in one layer, on a cookie sheet covered with tinfoil (in case of leakage, you can skip the tinfoil if you want). Toast the toast in the oven for 5-7 minutes on one side, flip, and do again 5-7 minutes on the other side. You're not going for toasted toast, just crisp up the bread. If you weren't too worried about fat and all that, you could coat each side with butter or margarine for a moister toast, but it's not needed.
After toasting both sides, carefully spread one big spoonfull of tuna salad onto the toast, getting it into the corners and making it flat on top. Add one tomato slice on top of each mountain, and top with one slice of colby jack cheese. Bake for 10-13 minutes or tuna is heated through and cheese is melted. If you like crispy, you could broil it at the end.
PS How many does it serve? I dunno. Our servings at our house aren't the same as the ones on the packages. This recipe as is, is probably servings for about 6-8. We served 4 plus about equal in leftovers.
PPSS The Texas Toast is 19 grams of carbs per slice. Which isn't so bad, because they are open faced sandwiches. If you use the tuna salad for regular sandwiches, we use the low carb bread that's about 9 grams of carbs each. About the same difference.
September 12, 2007
Lemon Curry Sauce Over Pork Chop
6 TBSP Butter
11 cloves garlic
1 tsp lemon peel (bought in the spice section)
5-8 tsp curry (to taste)
1 lemon
8 oz cream cheese
8 oz sour cream
2-3 tsp lemon pepper seasoning
Set out cream cheese to soften.
Melt 4 TBSP of the butter in sauce pan, saute sliced garlic until soft and slightly browned.
Lower heat.
Add other 2 TBSP of butter.
Warm lemon in microwave for 20-30 seconds, roll on counter to soften. Cut in half, squeeze all juice into pan, break up lemon flesh with fork and add to pan.
Add 3-5 tsp of curry, and 1-2 tsp lemon pepper, stir over low heat for 2-3 minutes.
Cube cream cheese, stir in a few cubes at a time, letting them warm and melt into mixture.
When most of cream cheese is melted, stir in sour cream.
Stir occasionally over low heat for 10-15 minutes.
As sauce:
Spoon warm sauce over grilled or broiled pork chop and rice.
Also use on chicken or steak.
As spread:
Refridgerate leftover sauce overnight. Tastes great spread on crackers.

11 cloves garlic
1 tsp lemon peel (bought in the spice section)
5-8 tsp curry (to taste)
1 lemon
8 oz cream cheese
8 oz sour cream
2-3 tsp lemon pepper seasoning
Set out cream cheese to soften.
Melt 4 TBSP of the butter in sauce pan, saute sliced garlic until soft and slightly browned.
Lower heat.
Add other 2 TBSP of butter.
Warm lemon in microwave for 20-30 seconds, roll on counter to soften. Cut in half, squeeze all juice into pan, break up lemon flesh with fork and add to pan.
Add 3-5 tsp of curry, and 1-2 tsp lemon pepper, stir over low heat for 2-3 minutes.
Cube cream cheese, stir in a few cubes at a time, letting them warm and melt into mixture.
When most of cream cheese is melted, stir in sour cream.
Stir occasionally over low heat for 10-15 minutes.
As sauce:
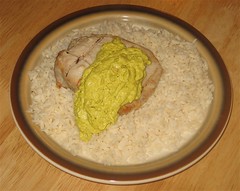
Spoon warm sauce over grilled or broiled pork chop and rice.
Also use on chicken or steak.
As spread:
Refridgerate leftover sauce overnight. Tastes great spread on crackers.
September 05, 2007
Meatloaf Cake
My 'famous' Meat Loaf aka Meat Wads, made into Meatloaf Cake
2 lbs ground beef
1 lb ground pork (plain pork, or ground pork sausage of whatever flavor strikes my fancy that night--or is on sale)
1 box pork flavored stuffing mix
2 eggs
2 cups shredded cheese (usually cheddar, but subject to change)
Any/all (within reason) of the following:
Garlic Powder
Fresh Ground Black Pepper
3-4 Tbs Mustard-any flavor
2-3 Tbs Steak sauce
Mustard Seed
Caraway Seed
Put into cake pans. 45 minutes @ 400 degrees.
Mix up mashed potatoes from the box while 'cake' is cooking, 'frost' warm 'cake' with mashed potato frosting and decorate as desired.
Recipe modified from a recipe found on the Stove Top Stuffing box, that recipe here.
August 02, 2007
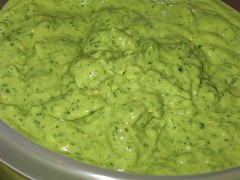
Green Salsa
Green Salsa
Thursday, August 02, 09:50 PM By Shelly
9 medium tomatillo tomatoes
4 clove garlic, peeled
2 jalapeno chile pepper
2 bunches fresh cilantro
7 ripe avocados
Chop cilantro, dice garlic and chile, cut tomatillos into thumb-sized pieces.
Cut avocados in half, remove pit, and squish flesh out of skin.
Puree all ingredients in blender, you might have to do it in batches, depending on how big your blender is. If you have a food processor, that would probably work even better, but I've never used one, so I can't say
For best taste and dipping value, refrigerate for several hours or overnight
Serve on tacos, or use as dip
December 17, 2006
Pinwheels & Pot Lucks
 We had a Holiday potluck at work, which included all three floors, and that means 5 different teams of people. Out of a potential couple hundred, I think between 75-100 actually joined in. I was not on the committee, but they did a pretty good job, outlining each team to bring a specific category. Our food was appetizer and salads (on the team I was on last week). So I was looking for a good crescent roll pinwheel recipe. I've have made Mexican Confetti pinwheels for another potluck. Those are fun, because you can make them very spicey, which I did. But this time I wanted a calmer version because I didn't know all the people that would be participating in our little dinner. The Pillsbury site has a dozen or so great pinwheel recipes, I chose the Bacon and Cheddar recipe (sans the green onions--someone told me there was an ecoli question with green onions, anyone else heard of that??). They were of course great. But it wasn't until I was in line, and saw that someone had brought a nice vegetarian loaf, in it's box so we could see what it was, that I thought we should have labeled things. When we have our smaller Food Days, there's a potential of 50 or so people, and usually 25-30 bring stuff (and of course, one guy never brings anything, but is always found grazing around the table). In the smaller venue, it's easier to let people know who made what and what's in it. When I made those cathedral windows, and the recipe said pregnant women shouldn't eat them because of the raw eggs, I went straight to the pregnant woman and let her know not to eat them. In a larger group, especially where you don't know everyone, you can't go warn folks individually. So I think we should have somehow labeled things. I think my pinwheels clearly showed the bacon, but I would hate for someone to go against their dietary or religious eating preferences by mistake.
Photo from the Pillsbury site
Mexican Confetti Pinwheels (recipe from Pillsbury)
Prep Time: 15 min ; Start to Finish: 35 min
Makes: 24 appetizers
Nacho cheese dip provides a kick in a tender crescent appetizer.
1 can (8 oz) Pillsbury® refrigerated crescent dinner rolls
1/4 cup nacho cheese dip
1/3 cup finely chopped red bell pepper (1/3 medium)
1/3 cup chopped green onions (5 medium)
1 . Heat oven to 350°F. Unroll dough and separate into 4 rectangles; firmly press perforations to seal.
2 . Spread cheese dip over each rectangle to within 1/4 inch of edges. Sprinkle with bell pepper and onions.
3 . Starting with one short side, roll up each rectangle; press edge to seal. With serrated knife, cut each roll into 6 slices; place cut side down on ungreased cookie sheet.
4 . Bake 13 to 17 minutes or until edges are golden brown. Immediately remove from cookie sheet. Serve warm.
September 05, 2006
Bisquit Quiche
 Bisquit crust made from Jiffy mix. Eggs and milk, and a handfull of the peppers out of the freezer. Couldn't be easier!
August 30, 2006
Birthday Treats
Happy Birthday to my Guy!
Bringing treats to the office for him, and since he's diabetic, I wanted to maybe forgo the traditional cake, so I was excited to find this recipe. It sounds great for a guy to bring for treats for his birthday, right?
Well, he still wanted the cake, and since he promised to only eat one small piece, and give the rest to his co-workers, I gave in. The cake was just box mix and canned frosting, but I made it layered, and it looked nice.
On the sausage pastry puffs, I was so prepared, I had bought the filo dough a few days before, and had put it into the fridge to thaw the day before. I didn't quite understand the part of the recipe that said to roll it out bigger, as I didn't think you could really roll out those thin layers. And I didn't understand why we weren't putting something between the layers. Everything was right on time, the sausage pastry puffs would be done and warm right at the best time to take him his supper.
And that's when I realized my mistake! I had bought filo dough instead of puff pastry. I had filo dough in my head. So I ran over to the close store, found frozen puff pastry, defrosted it a little in the microwave, let it set on the heated stove to finish defrosting. I used this defrosting time to frost the cake, when I had planned on using the cooking time.
Everything was done and delivered and appreciated, just an hour and 1/2 later than I meant to get there. Most of the work folks weren't so hungry by then, but that left more for my guy to save for his supper the next night. I didn't get any photos, being in the rush I was, but they looked as good as they tasted.
And now I have a thawed filo dough in my fridge, I'd better make something good with it this weekend!
Sausage Puff Pastry Bites (from Very Good Things)
Makes approx. 40
Adapted from The Essential Baking Cookbook recipe
1 box of puff pastry, room temperature (You will use both sheets)
2 eggs, lightly beaten
1 1/2 lb sausage (You are gonna laugh, but I actually used some fresh brats and discarded the casings.)
1 onion, finely chopped
1 clove garlic, crushed
1 cup fresh breadcrumbs
3 Tbsp. chopped fresh parsley
3 Tbsp. chopped fresh thyme
1/2 tsp. each of ground sage, nutmeg, black pepper and cloves
Preheat oven to 400f degrees. Lightly grease two cooking sheets.
Roll out puff pastry sheets to about 14"x14". Lightly brush the pastry sheets with some of the beaten egg.
Mix half of the remaining egg with the remaining ingredients in a large bowl, then divide into two portions. Lay puff pastry out on cookie sheets. Pipe or spoon the filling down the center of each piece of pastry, then brush the edges with some of the egg. Fold the pastry over the filling, overlapping the edges and placing the join underneath. Brush the rolls with more egg, then cut into small pieces. Spread apart on baking sheet.
Cut a small slash on top of each roll and bake for 15 minutes. Reduce the oven temperature to 350f degrees and cook for another 15 minutes, or until puffed and golden. Let cool slightly and enjoy.
August 25, 2006
Food Day: Dark Spicey Chocolate Cookies
 I had been wanting to try this recipe ever since I saw it. I've always heard that spicey brings out the flavor of good dark chocolate. And boy, did it ever! I made the recipe plain, no filling. They were the best! I had to hunt around town for the Dutch cocoa, but it was totally worth it. Some for all interested parties at work's food day, and a couple to share at home. I'd like to make this recipe, and keep the logs frozen, and cut off just a few at a time. Great cookies anytime.
Maida’s Mexican Chocolate Icebox Cookies (Recipe from Cookie Madness)
1 1/2 cups flour
3/4 cup quality Dutch-process unsweetened cocoa
3/4 teaspoons ground cinnamon
1/2 teaspoons cayenne
1/4 teaspoon salt
1/4 tsp freshly ground black pepper
1 cup sugar
1 1/2 teaspoons vanilla extract
1 egg
12 tablespoons cold unsalted butter, cut into small pieces
Whisk the flour, cocoa, cinnamon, cayenne, salt, and pepper together in a medium bowl and set aside.
Put sugar, vanilla, and egg into a large bowl and beat with an electric mixer on high speed until thick and pale, about three minutes. Add butter and continue to beat on high speed until smooth, about three minutes more. Using your fingers work flour mixture into butter mixture until dough is just combined. Divide dough in half and roll each half into a 9-inch log. Wrap each log in parchment paper, twisting ends tightly to make a uniform cylinder. Freeze dough logs for at least eight hours and as long as overnight.
Preheat oven to 350˚ F. Unwrap dough and slice each log into rounds 1/3-inch thick. Place rounds one inch apart on parchment paper-lined cookie sheets. Bake cookies until slightly puffed and tiny cracks appear on surface, about eight minutes. Transfer cookies to a rack to let cool. Makes about four dozen cookies.
August 15, 2006
Hot Stuff in the Freezer

I got this idea from my maternal grandmother. When she cleaned out her chest freezer last year, we 'inhereted' several items, including a few bags of chopped onions. She cooks for just herself now, and probably doesn't need even a whole onion.
When I made a recipe that wanted a part of each red, yellow, and green peppers, and red onion, I decided to chop the rest up for the freezer. Other times, I would have a 1/2 pepper left to rot, or just skip the recipe alltogether. Yes, I did think about putting each type seperately, or at least the onions, but this time I chose to put them all together, based on when I think I will use them.
Subscribe to:
Posts (Atom)